Do we know all about Default Dimensions? How to make a dimension Code Mandatory for all the the accounts in Chart of Accounts


Simple. Open Chart of Account, Select all the accounts there, Click on Account > Dimensions > Dimensions-Multiple. Choose the dimensions you want to make mandatory for the accounts and mention 'Code mandatory' in 'Value Posting' field. That's it.

That's the most common answer you will have if you ask somebody how to make a dimension mandatory accross all the accounts in Chart of Account. This common answer is the most common mistake functional consultants make during implementation. Yes, the common answer is not at all right answer.

The above descrbed method of making a dimension mandatory is only valid to make a dimension mandatory for a set of accounts only. Not for entire all the accounts of Chart of accounts.

You may argue - Why not? I am selecting all the accounts from Chart of accounts and making a dimension mandatory for them. And it works.

But think again. Think about a situation where you are creating a new account in Chart of Account.
The dimension you made mandatory for rest of the accounts will not be readily become mandatory for this new account.
So you have to make that dimension mandatory for this new account manually following the same method. If you forget, it can be a disaster waiting for you.

Rather the right mehtod of making a dimension madatory accross all the accounts is much simpler and fullproof (foolproof as well). Use the 'Account type default Dim.' feature. Its available in the Dimension window itself.
Open the Financial Management > General Ledger > Setup > Dimension.
Select The Dimension you want to mandatory accross all accounts
Click Dimension > Account Type Default Dim.
Mention the table no. behind the Chart of Account (That's Table no. 15)
And mention that it's 'Code mandatory' in the 'Value Posting' field.
And this will ensure that the particular dimension is mandatory for entire set of records of te table no. 15 (nothing but the Chart of Account). And in future, any new accounts created in charts of accounts will be automatically included in that mandatory list.
This is the way you can make a dimension mandatory for a entire type of account. For example, the customer account, Vendor Account, Item Master etc.
Reblog this post [with Zemanta]

Dimension, Shortcut Dimension, Global Dimension - Confused?

People often gets confused about the terms used to describe dimensions. - Dimension, Shortcut Dimension, Global Dimension - are they same or what? Why we need so many different dimensions?

To understand the concept you need to go back to history of Navision and also need to understand the basic concept of Dimension. Let me try to elaborate it.

Dimension: Dimensions are nothing but parameter for your analysis of data. In other words, they are additional information attached to your tansactions and you can analyse / summarize your transactions on the basis of those parameters. Say, you want to analyse your fuel expenses on the basis of Car no. So you need to define a dimension called 'Car' and put all the car nos in the dimension value list.

Similarly, if you need to analyse telephone expenses on the basis of Telephone nos or travel expenses on the basis of employee nos then, you will define Telephone and Employee Dimensions and list down the dimension values for those dimensions. So at the end you can have a list of dimensions & their values as below:

--- Car --- 1001 --- WB 300356

--- 1002 --- UP5005333

--- 1003 --- DEL678932

--- Tel --- 98444320 --- Ashsih Banerjee
--- 87909098 --- Snehanshu Mandal
--- Emp --- 1001 --- Snehanshu Mandal
--- 1002 --- Vinay Iyer
--- 1003 --- Shridhar Varasala

You can define the dimension in Navision from 'Financial Management > General Ledger > Setup > Dimensions > Dimension'. And then define the respective dimension values.


This way you can define any no of dimensions and attach any no of dimension values while entering any transaction in the system.

Now that's was Dimension. So what is global dimension? Lets go back few years down to navision's history.

There was time when navision didn't have the facility to attach unlimited no of dimensions to transactions. Instead it had only 2 fixed dimensions with each transactions - Department & Project. And to attach these 2 dimension with each transactions, Navision had created these 2 fields in all the transaction tables (e.g in 81 - Gen. Journal Line, 36 - Sales Header, 37 - Sales Lines, 38 - Purchase Header, 39 - Purchase Header and so on). See the figure below.

Now you can't just keep on adding new fields in each transaction table to achieve unlimited no of dimension attachment feature. So navision started storing dimension informations attached to different transactions in 2 separate tables (Journal Line Dimension - for storing dimensions attached to all journal transactions, Document Dimension - for storing dimensions attached to all document type of transactions). So Navision came up with a different method of storing dimension values attached with transactions.
What happened to the 2 fields present in all transaction tables? To reuse these 2 fields, Navision came up with a concept called 'Global Dimensions'. So 2 dimensions from your dimension master can be defined as Global Dimension and their values can directly be attached with any transaction (in those 2 fields present globally - They automatically take the caption of global dimension defined and displayed accordingly to users - using 'CaptionClass' property). Just because they are present in all the transaction tables, these dimensions make it easier to take out reporting based on these 2 dimension and helps you in easy data entry. Ideally they are the most commonly used dimensions accross in Navision Company.
So global dimensions are nothing but ordinary dimensions. Only thing they are globally present in the system and helps in data entry (dimension attachment) and reporting on most commonly used dimensions in a company.
But if you are going to attach more than 2 global dimensions in transactions, then the very attachment of dimension process is slightly lengthy. I mean you need to click on the transaction line > click on button 'Line' > Dimensions > Select the dimension code and dimension value.
Can we make it little easier for data entry where more than 2 global dimensions you need to attach to transaction? Off course we can. Use the concept 'Shortcut Dimensions'
Shortcut Dimensions: There can be 8 dimensions displayed directly on any tabular transaction form (Journal lines or Purchase Lines, Sales Lines etc) just to facilitate the data entry. Remember, these dimension will not be present directly in the table but only displayed in the form. They are shortcuts to 8 different dimensions. So that you don't need to go for the lengthy dimension attachment process. That's why the name came 'Shortcut Dimension'. And the 2 global dimensions automatically gets assigned as first 2 shortcut dimensions. (Check out the General ledger setup).
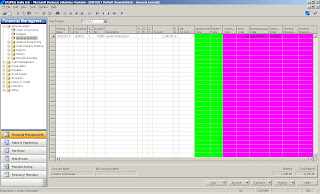
See the screen left (General Journal) and you will find there are 8 dimensions present (coloured columns). These are 8 shortcut dimensions. First 2 are global dimensions (directly present in the Gen. Journal Line table - the transaction table used here) coloured green are automatically became first 2 shortcut dimensions. Rest 6 columns are just displayed in the form only to facilitate the data entry (not present in the Gen. Journal Line table). If you enter some values in those columns, system will insert the relevant dimension and dimension values in the journal line dimension table for the transaction. If you enter values in first 2 shortcut dimensions, they will be inserted in the global fields present in the current transaction tables as well as the journal line dimension table.
That's the funda of Dimension, Global Dimension and Shortcut Dimension. Hope i am able to clear the idea a little bit. If you want to discuss it further, do send me your comments or simply fire a mail to me (snehanshu.mandal@gmail.com).
See you in next post.

What is No. Series Relationship?

I got surprised when i discovered that so many people working in Navision for quite some time doesn't understand No. series Relationship feature.
So what is No. Series Relationship?

Say you want to generate different invoice nos based on to where (geography) you are selling your service / material. So your domestic sales can have invoice nos which is different from invoice nos of export sales.

Now to implement the above feature, you need to use at least 2 no. series for invoice numbering? But in Sales & Receivables Setup's Numbering tab, you have provision of mentioning only one no. series for Sales Invoice nos. how to resolve this?

You can go for some customisation or simply use the No. series relationship.

No. Series Relationship is a feature in Navision which helps you to group multiple no. series together and use it for one document no. Take an example of a sales Invoice. This feature will make 2 (or more) no. series related to each other and both can be used for the sales invoice nos.
Lets do it in Navision.
Create 2 no. series S-INV and S-INV EXP. First one for the domestic Sales & Second one for Export Sales.

Now relate the second no. series (S-INV EXP) with the first one with no. series relationship. To do that, select the seclect the S-INV in no. series window and click on the menu button series -> Relationships. Select the second no. series (P-INV EXP) in this window. Close it.
Your relationship between the 2 no. series is done. Now to use these no. series for sales invoice nos, you need assign it to sales & Receivables Setup.

Open Sales & Receivables Setup and go to the numbering tab. Choose the first no. series (P-INV) in the Invoice Nos.
Now you are ready to use both the no. series to generate the Sales Invoice nos. To test it -
Open the sales Invoice Window (Sales & Marketting -> Order Processing -> Invoices) and press F3 to create a new Sales Invoice. Don't tab away from the no. field. Now click on the assist edit button (the 3 dot button) next to No. field and you will find system is suggesting both the no. series to you. Select any one series (depending on what type of Sales invoice - Domestic / Export you are creating) and a new no. document no will be generated.
So, you have the option of using 2 no. series (or more) for one single document no. You can extend this functionality further by automating the selection of no. series own the basis of USER ID.
Experiment on it. See you in next post.

Disabling F4 - Stopping inadvertent Delete

Can we disable the F4 function button in Navision?

Few years back, I had a situation in one of my implementation, where users used to delete the sales order inadvertently by pressing F4 (Their intention was to create a new order by pressing F3).

Now how to stop it. I had solved it in a very simple way by creating a new dummy menu item in one of the menu button present in the order window and assigning F4 as the shortcut key to that menu item. It just overridden the default F4 functionality (delete function). Here is how i did it -


Open the sales order form (Form 42) in design mode. Add a new menu item to the menu button 'Order' present in that form. Caption it as 'Dummy' and assign the shortcut key F4 to it.

Don't write any code for this menu item. So nothing will happen if somebody clicks on it.
Now if somebody press F4, system calls that menu item 'Dummy' instead of default delete call and nothing happens for F4. And your default F4 is disabled.
Do you have a better solution? Do write to me.

Inline Editing - Making your Chart of Account ineditable and Editable at the same time

After a long holiday, i am back. Will discuss about an wonderful property named 'InlineEditing'

Chart of account is a window where your list of accounts is displayed. The same window is used to create a new account as well as finding a particular account (you are looking for analysing it).

Now in Navision, in any in editable window, you can simply start typing in any text and system opens the search box to search that text. But as the Chart of Account is editable (its the entry window), if you start typing something intending to search for it, you can inadvertently overwrite any field in this window. And users do this mistake quite often.

Can we arrange something whereas the system will not allow you to edit this window at the first instance but will allow you to insert a new account if intended?

Yes, you can achieve this using the 'InlineEditing' property. Use this property to force the user to click in the table box or press F2 to begin editing the text inside the table box. In other words once this property is turned on, no editing will be allowed when the form is opened. The user must click on an active editable control, press F2 when an editable control is in focus, or choose to insert a new record to begin editing. So if the user start typing in something immediately after the window is opened, the search function (window) will open and no text will be overwritten by mistake.
This particular property belongs to the Table box. The table box is nothing but the control in any tabular form which displays the different fields from a table. Let do it -
Open the form 16 (the chart of account window) and select the tablebox control.
Go to the property of the tablebox and find out the property 'Inlineediting'.


Make it true (Yes). Save the form.
Now reopen the chart of account and see whether it is editable in the first instance or when the form is opened. You will find the you need to click on any field or press F2 to edit it. Otherwise, if you start typing in any text, the search window opens immediately.
Note: You can also set this property dynamically in the runtime depending different criteria.
Hope this serves the purpose of making the chart of account in editable and at the same time, he
same window can be used to edit and insert record.
See you in next post.